Introduction
Live multitrack 2 is born from years of experience gained with version 1. It thus retains the basic concepts, extending and enhancing them with new features.
Entirely rewritten from scratch, LM2 is designed and optimized for a touch-friendly experience for optimal use on iPad.
LM2 is not a DAW and does not aim to replicate its behavior. It does not include audio editing tools or integrations with virtual instruments or virtual effects.
It focuses entirely on the management of sequences for live use, but not exclusively.
LM2 can also be used as a educational tool, allowing the quick import of audio tracks and providing a series of useful tools to support practice and learning (track muting or soloing, pitch and speed adjustment, a timeline with markers with the ability to add annotations and other types of events explained further on).
SET LIST (page)
The SET LIST page is the main section where you start creating your own collection of songs. The menu is divided into two main areas. The first, SET LIST, allows you to add other collections, delete the current one, duplicate it, rename it, import or export from or to file. In the second main area, Songs, you can manage the songs within the setlist. You can add, duplicate, copy, paste, import, and export a song.
Each feature is described in detail below.

Quick Options Bar.

Opens the left menu with the list of available actions.

Set list list. Allows you to select the set list you want to load.

Set list previous/next selection. Loads the previous or next set list, if they exist.

Searches for a song within any set list. Selects the first occurrence found. Repeating the search will return the next occurrence found.

Adds a set list. The same operation is also possible from the section menu.

Adds a song. The same operation is also possible from the section menu.

Enables the reordering of songs.

Locks the screen to prevent unwanted interactions (especially during a live performance).
SET LIST MENU - SET LIST
ADD NEW
Creates a new set list. You will be prompted to enter a name. A default name is automatically given, which can be changed later if desired.
DELETE
Deletes the current set list. Confirmation of deletion is required.
DUPLICATE
Duplicates the current set list. The suffix "(copy)" is added and the new set list is selected.
RENAME
Renames the current set list. You will be prompted to enter the new name.
IMPORT
Imports a previously exported set list. Select the folder where an export was previously saved. The import will create the new set list and all the songs within it.
EXPORT
Exports the entire set list, including all the songs and audio files within it.
Select a valid folder and wait for the process to complete.
SET LIST MENU - SONGS
ADD NEW
Adds a new song to the current set list. When you launch the application for the first time, the set list is empty. However, it is possible to insert a new song, and a default set list will be created.
DUPLICATE
Duplicates the current song. The suffix “(copy)” is added and the new song is selected.
COPY
Copies the currently selected song to memory. This operation precedes the "PASTE" operation.
PASTE
Pastes the previously copied song. You can also paste the song into a different set list.
IMPORT
Imports a previously exported song. Select the folder where an export was previously saved. The import will create the new song and all its tracks and settings.
EXPORT
Exports the song, including all audio files and settings.
Select a valid folder and wait for the process to complete.
VIDEO SECTION
Starting from version 2.1.0, it is possible to load and show a video for each song.
The video will be synchronized to the audio and will follow all timeline movements.
The most common formats are supported.
Entering the setlist section, you can view the list of songs.
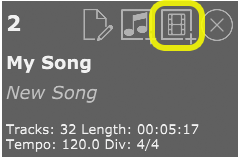
Click on the song to which you want to associate a video.
Click on the filmstrip icon at the top right.
The video screen for the selected song will open.

From here, you can associate a video using the "Add video" button.
With the "Remove" button, you can remove the video from the song.
If you have multiple screens connected, options for managing these will appear:
The on/off switch will allow you to show the video on the selected external screen.
Through the specific selection, you can choose which screen will display the video.
In the center, the video frame will be displayed, allowing you to view and control the associated video within the application.
At the bottom left, the filename and total duration will be displayed.

This button allows you to enlarge the video to fill the entire application area.
Notes for the iPad App
The video files must be copied inside the App's Document folder, or they won't be found when the App starts. Use the File app to move files from the Gallery or from another App's folder
to the LM2's document folder.
To connect an external monitor (or video projector) to the iPad you need a specific Apple accessory that allows you to both keep the iPad charged and connect the device.
Find the original accessory in the Apple Store website. Using 3rd party or after-market accessories is not recommended.
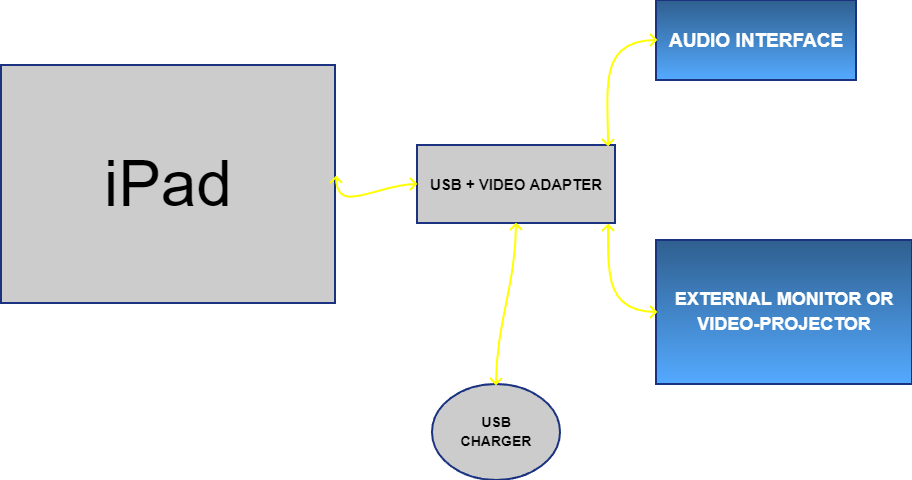
Please note: only the iPad Pro featuring the Apple Silicon processor family can support the dual view (App view on the internal screen and video on the external screen).
Normal iPads will only mirror the internal view to the external screen.
When connecting an HDMI external screen using the dedicated accessory, it is likely that the audio interface is automatically switched to the HDMI audio port.
If you don't intend to use the HDMI audio feature, you should first plug the HDMI connector and then your sound device connector.
In some cases, you should be able to switch the audio device from the AirPlay option screen.
Unfortunately these selections cannot be done from within Live Multitrack 2 as the iPadOS takes control over which audio device has the priority.
EDIT MIX (page)
In this page, you can manage all audio tracks, add new ones, and adjust all necessary parameters.

Button for adding files/tracks, removing all tracks, and buttons for moving forward or backward between songs in the current set list.
Channel strip
- The track number is indicated at the top left
- The delete button is located at the top right (audio files are not deleted)
- Just below the delete button is an indicator of the track's number of channels (1 ring = mono; 2 crossed rings = stereo)
- FX 1 = Delay effects send
- FX 2 = Reverb effects send
- PAN = Audio panning adjustment (left-right)
- Phase inversion button
- Mute (M) and Solo (S) buttons
- Compressor activation button (D)
- Equalizer activation button (EQ)
- Track editing button (e)
EDIT (SUBSECTION)

Top options bar
- Audio output group selection
- File info button: Format, file name, sample rate, bit rate, number of channels, and duration
- Button to open the folder where the file is located to identify its physical location
- Track name. You can assign a new name
- 3 buttons for managing compressor presets (list, add, delete)
- Button for managing track parameter copy/paste
- Edit close button
- Compressor effects unit
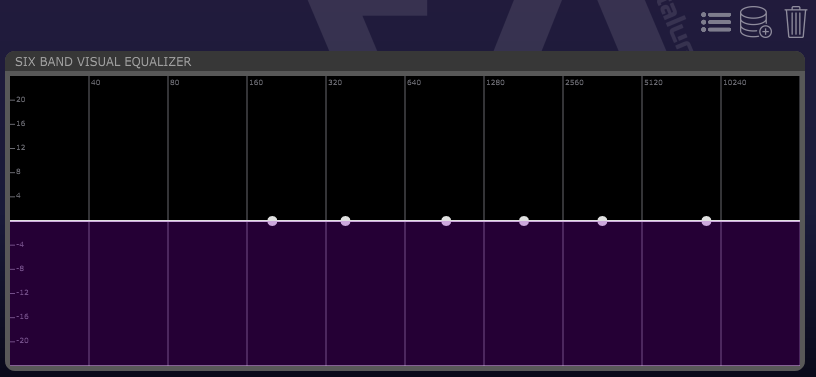
6-band equalizer with preset management buttons

- Solo mode: Latch = allows multiple channels to be set to solo mode; Radio = allows only one channel at a time to be set to solo
- Solo: button to deactivate all "solo" channels
- Mute: button to deactivate or activate all "mute" channels
- EDIT FX: opens the effects page
- FX Group: sets the output bus for the effects section
- Click Group: sets the output bus for the click
- PAN potentiometer for track panning management
- MUTE and SOLO buttons
- Compressor activation button (Dyn)
- Equalizer activation button (EQ)
- FX 1 = Delay effects send
- FX 2 = Reverb effects send
- Selector for moving forward or backward between tracks
LIVE (page)
On this page, you can monitor the timecode and measures in beats if the click is enabled. You can also focus on adjusting the output buses and setting their physical output channels provided by the audio interface.

Time and measures indicator.
Clicking on the "Timecode" box opens the basic song parameters editing.
Clicking on the "Measures" box opens an enlarged window of the Measure and Beat indicator.
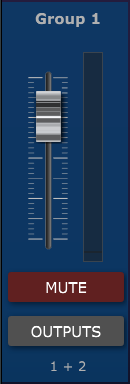
8 output buses are available.
For each, you can set a specific name by clicking on the text that appears at the top.
You can also set the volume, mute, and output channels of the audio interface.
The "natural" icon allows the bus to be excluded from the pitch shifting process shown below. This is particularly useful for drum buses.

In this area, you can select a different song from the list.
Pitch and Speed functions: allow you to change the pitch of the song or speed it up. With the "Keep pitch" button, you can synchronize the two functions to maintain the pitch when changing the speed.
Note! The Pitch and Speed functions are temporary. They are not saved with the song.
MIDI MAP (page)
Page for MIDI settings. Specifies MIDI messages and which App parameters are controlled by them.
You can enable/disable the Midi response of control change and MMC messages.
The parameters that respond to MIDI messages are:
- Bus volumes
- Bus mutes
- Play
- Stop
- Prev. Marker
- Next Marker
- Prev Song
- Next Song
SETTINGS (page)
Page for global settings.
- Auto-Save All on exit: performs a final save of all modified parameters on all songs and tracks when the application is closed
- Restore Cursor Position: saves the position of the song cursor on the timeline when saving. On the next reload, the song will start playback from the saved point
- Restore Timeline Zoom: the last used zoom level is always saved with a song, enable this option to restore it when a song is loaded
- Convert and Import: for imports, you can specify the default behavior: ASK = asks whether to convert audio files or leave them in the original format; ALWAYS = always converts to Wav format; NEVER = always leaves files in the original format
- Click Level: specifies the overall volume of the click
- Flash Screen: enables a visual signal in sync with the click on the "Live" page
- Click Length: adjusts the duration of the click sound
- Click Pitch: adjusts the pitch of the click sound
- Always on External Display: Enables external screen display for all videos.
- External Display: Select which external display to use for all videos
DEVICES (page)
Screen for selecting audio devices and MIDI peripherals
Timeline
The timeline allows you to manage the playing position, view all useful data of the current song, perform precise zooming, and set markers.

The bottom shows the cursor position, total song length, zoom status, BPM, and time division.
The numbered vertical bars represent the markers added to the song.
To edit a marker, you can double-click (mouse) or double-tap (mobile), or position on the marker and press the red EDIT button.
To delete the marker, press the red DEL button.
Editing Markers (Actions)
Actions can be added to markers: Jump to another marker or another song, show a text, send a MIDI message.
Jump to
Set the "Jump to" button to ON to enable the function.
By default, the jump is set to another Marker. You can change it to a song using the "Marker or Song" selection button.
Finally, select the marker or song to jump to.
Text
Allows you to specify a text to display during playback.
Set the "Text" button to ON to enable the function.
Decide whether the text should be shown or should hide the previous marker's text using the "Text Show or Hide" selection button. By default, it is set to "show".
Optionally, set a duration in seconds (the seconds depend on the marker's position). Leave 0 for indefinite duration.
Finally, set the text to display using the "EDIT TEXT" button. You can define a specific size and color for the current marker.
Send Midi Message
Allows you to specify a MIDI output message during playback.
Set the "Send Midi Message" button to ON to enable the function.
By clicking the "ADD EVENT" button, you can add one or more events to send as MIDI output.
To change the message type, click the "Type" button. The allowed types are PC (Program Change), CC (Control Change), NOTE ON, NOTE OFF.
Set the output channel for each event.
For PC (Program Change), DATA1 represents the PC number to send.
For CC (Control Change), DATA1 represents the CC number to send and DATA2 represents its value.
For NOTE ON and NOTE OFF, DATA1 represents the note number to send and DATA2 represents its velocity.